「アクセスが拒否されました」: コンテンツにアクセス/編集/同期できません

Android 5 以降では、アプリが共有ディレクトリ (/Music など) にコンテンツを保存/同期/編集できます。それができない場合は、次のいずれかの要件が満たされていない可能性があります。

  1. 権限: コンテンツを編集/削除/同期するには、Android 用 MediaMonkey にストレージ場所への書き込み権限が必要です。
  2. ライブラリへの組み込み: コンテンツを MediaMonkey for Android ライブラリに表示するには、コンテンツを含む場所をライブラリの一部として構成する必要があります。
  3. 同期プロファイル: Android 用 MediaMonkey と Windows 用 MediaMonkey は、相互に同期するように正しく構成されている必要があります。

許可

Android 5 以降* を実行しているほとんどのデバイスでは、SD カードへのアクセス許可が付与されると、MediaMonkey は SD カード上の /Music や /Videos などのディレクトリにアクセスして同期できます。Android 11 以降を実行しているデバイスでは、MediaMonkey 2 は Android の新しいプライバシー/セキュリティ技術を使用して、アクセスが許可されたフォルダーのみに MediaMonkey のアクセスを制限します。

特定の Samsung、Oppo、Vivo デバイスでは、フォルダーへのアクセスを許可できない場合があり、操作を実行すると「アクセスが拒否されました」というエラーが発生します。この問題を回避するには、次の操作を実行します。

  1. フォルダー権限に関するアプリケーション要求を受け入れるように Android を手動で設定する:
    1. Androidの設定に行き、「すべてのファイルへのアクセス」を探してタップします
    2. 右上隅の3つのドットメニューをタップし、「システムを表示」をタップします。
    3. リストで「外部ストレージ」を見つけてタップします
    4. 「すべてのファイルの管理へのアクセスを許可する」権限設定を有効にします
    5. MediaMonkeyを再起動し、プロンプトが表示されたら権限を付与します。
  2. 一部のデバイスでは、MediaMonkey に SD カードへのアクセスを手動で許可すると機能する場合があります。
    1. Androidの設定に移動
    2. 「セキュリティとプライバシー」->「プライバシー」->「権限マネージャー」->「ファイルとメディア」に移動します
    3. 右上隅の3つのドットメニューをタップし、「システムを表示」をタップします。
    4. 次に、「すべてのファイルにアクセスできるその他のアプリを表示」をタップします。
    5. MediaMonkeyの「外部ストレージ」を有効にする
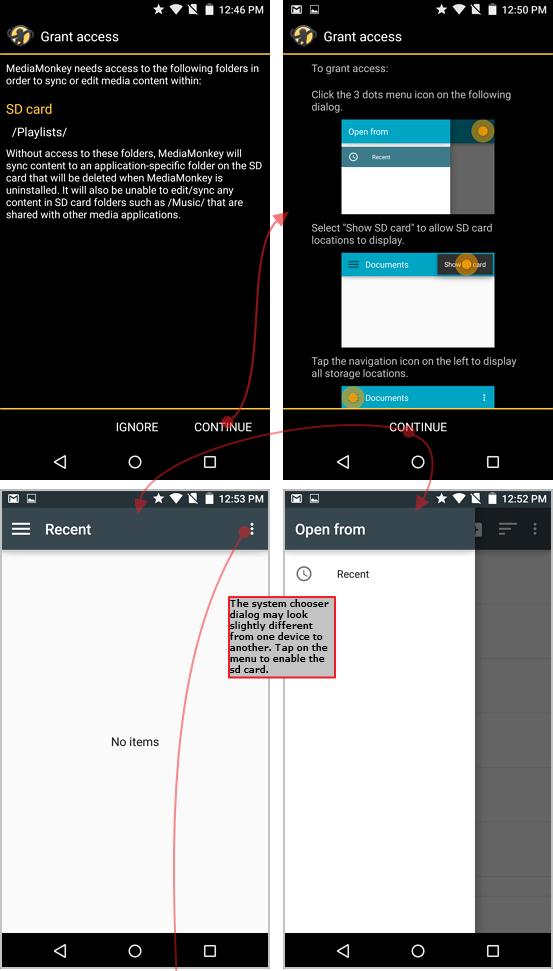
MediaMonkey は通常、特定のディレクトリのコンテンツの読み取り/書き込み/削除に必要な権限を自動的に要求します。以下の画面は、MediaMonkey 1.x で SD カードへのアクセスを許可する方法を示しています。これらのダイアログは MMA 2.x でも同様に機能しますが、Android 11 以降では、ストレージ メディアではなく特定のディレクトリへのアクセスを許可する必要があることに注意してください。

  1. MediaMonkey は、SD カード上のフォルダーへの書き込みアクセスを許可するかどうかをユーザーに尋ねるダイアログを自動的に表示します (ユーザーがこれをスキップした場合は、[オプション] > [外部ストレージへのアクセスを許可] からこれを再開できます)。
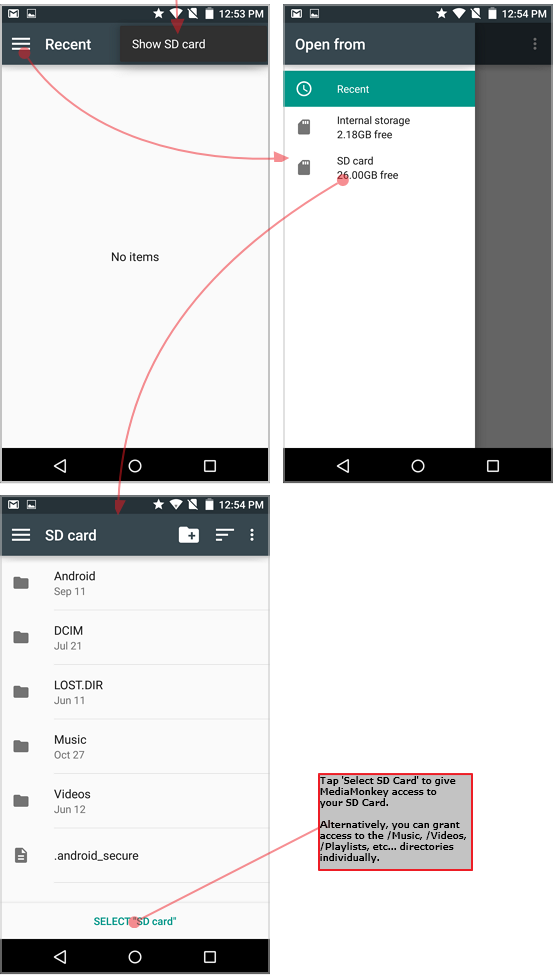
  2. 次に、MediaMonkey は Android システムのフォルダ選択ダイアログを開き、ユーザーはそこから特定のフォルダ (または SD カード全体) を選択して、その場所への MediaMonkey のアクセスを許可できます。


注記:

  • Android のカスタマイズされたバージョンには、「SD カードを表示」オプションがない場合があります。例:
    • 一部の Huawei デバイスでは、[設定] で [x] 詳細なデバイスを表示 を有効にした後でのみ、[開く] (上記参照) に SD カードが表示されます。次に、SD カードに移動して [すべて選択] します ([SD カードを選択] オプションがないため)。
    • 一部の Xiaomi デバイスでは、MediaMonkey をインストールした後 (ただし実行する前に)、[設定] に移動し、[インストール済みアプリ]、[ドキュメント] の順にタップし、下部にある [有効にする] アイコンをタップしてアクセスを許可する必要があります。その後、MediaMonkey を初めて実行します。
  • MediaMonkey が外部ストレージを検証できない場合、特定のデバイスでは共有フォルダーがサポートされないことがあります。このようなデバイスでは、同期はアプリ固有のフォルダーへの書き込みに制限されます。

ライブラリへの組み込み

権限が付与されると、MediaMonkey はアプリ固有のディレクトリ (SD Card/Android/Data/com.ventismedia.mediamonkey/Music など) から共有ディレクトリ (SD Card/Music など) にファイルを自動的に移動し、/SD Card/Music などの標準メディアの場所をライブラリ内に自動的に含めます。SD カードのコンテンツが見つからない場合は、[オプション] > [ライブラリ フォルダーの選択] から新しい場所を手動で追加できます。

プロファイルを同期

コンテンツを同期するには、MediaMonkey for Android と MediaMonkey for Windows が互いを認識して同期できるように設定する必要があります。MediaMonkey for Windows がデバイスを認識しない場合、またはデバイスが MediaMonkey for Windows を認識できない場合は、 この記事を参照してください。

関連記事:

MediaMonkey を Android デバイスと同期する [オンライン ヘルプ]

適用対象:

Translated automatically (see original)

‘Permission Denied’: Unable to access / edit / sync content

Android 5 and up allow apps to save/sync/edit content to shared directories (such as /Music). If you’re unable to, it’s likely because one of the following requirements aren’t being met:

  1. Permission: MediaMonkey for Android must have permission to write to the storage location, in order to be able to edit / delete / sync content.
  2. Inclusion in the library: In order for content to be visible in the MediaMonkey for Android library, the location containing the content must be configured to be part of the library.
  3. Sync profile: MediaMonkey for Android and MediaMonkey for Windows must be correctly configured to sync with one another.

Permission

On most devices running Android 5 and up*, MediaMonkey is able to access/sync to directories such as /Music or /Videos on an SD card once permission to access the SD card has been granted. On devices running Android 11 and up MediaMonkey 2 uses Android’s new privacy/security technologies to restrict MediaMonkey’s access specifically to folders to which access has been granted.

On certain Samsung, Oppo, and Vivo devices granting folder access may fail, and operations will result in a ‘Permission Denied‘ error. You can work around this problem by:

  1. Manually setting Android to be able to accept application requests for folder permissions:
    1. Go into Android Settings and search for ‘All files access’ and tap it
    2. Tap the 3-dot menu in the top-right corner and tap ‘Show System’
    3. In the list, locate and tap ‘External Storage’
    4. Enable the permission setting ‘Allow access to manage all files’
    5. Restart MediaMonkey and Grant Permissions when prompted
  2. On some devices it may work to manually grant MediaMonkey access to the SD Card:
    1. Go into Android Settings
    2. Navigate to ‘Security and Privacy’ -> ‘Privacy’ -> ‘Permission Manager’ -> ‘Files and Media’
    3. Tap the 3-dot menu in the top-right corner and tap ‘Show System’
    4. Then tap “See more apps that can access all files”
    5. Enable “External Storage” for MediaMonkey

MediaMonkey normally automatically prompts for necessary permissions to read / write / delete content on specific directories. The screens below illustrate how MediaMonkey 1.x allows one to grant access to the SD card. These dialogs work similarly for MMA 2.x, but remember–on Android 11+ you must grant access to specific directories (rather than a storage medium):

  1. MediaMonkey automatically displays a dialog asking the user to grant write access to a folder on the SD card (if the user skips this, it’s possible to restart this via Options > Grant access to external storage).
  2. MediaMonkey then opens an Android system folder chooser dialog, from which the user can choose a specific folder (or the entire SD card) in order to grant MediaMonkey access to that location.


Note:

  • Some customized versions of Android may not have a ‘Show SD Card’ option. For instance:
    • On some Huawei devices ‘Open from’ (see above) will only show SD cards after first enabling [x] Show advanced devices (in ‘Settings’). Then navigate to the SD card and ‘Select all’ (as there is no ‘Select SD card’ option).
    • On some Xiaomi devices, after installing MediaMonkey (but before running it), you need to go to Settings, Tap on Installed Apps, Tap on Documents, Tap on the “Enable” icon on the bottom in order to grant access. Then run MediaMonkey for the first time.
  • Shared folders may not be supported on certain devices if MediaMonkey is unable to validate the external storage. For such devices synchronization is limited to writing to app-specific folders.

Inclusion in the library

Once permissions are granted, MediaMonkey will automatically move files from app-specific directories (i.e. from SD Card/Android/Data/com.ventismedia.mediamonkey/Music) to shared directories (e.g. SD Card/Music) and automatically include standard media locations such as /SD Card/Music etc. within the library. If content from the SD card appears to be missing, you can manually add new locations via Options > Choose library folders.

Sync Profile

To sync content, MediaMonkey for Android and MediaMonkey for Windows must be configured to recognize one another so that they can sync. See this article if MediaMonkey for Windows does not recognize your device or your device cannot see MediaMonkey for Windows.

Related Articles:

Sync MediaMonkey with an Android device [online help]

Applies to: ,

Hide original

この記事は役に立ちましたか?